
Have you ever tasted real butter? I mean real, FRESH homemade butter? It's creamy, delicious and also good for you! It's so easy to make butter at home and well worth the little effort!

This butter recipe is just one of the recipes included in my Simple Cheesemaking ebook. Follow the link to find more wonderful cheese recipes with easy to follow instructions and much more!
There is nothing like the taste and feel of it on your tongue as it coats your mouth. Once you taste it, with all its creaminess, you have a greater appreciation for the expression "buttery soft".
Homemade Butter Is Good For You!
Well, not only does real butter taste good, but it is also good for you! I know, you are thinking about all the fat in real butter that we should be avoiding. While this may be a "politically correct" view, the fact is, animal fats are good for you. Not only do they provide energy but they also act as carriers for the fat soluble vitamins A, D, E, and K.
So, don't be afraid - go ahead - lather the butter on your bread - it's good for you!
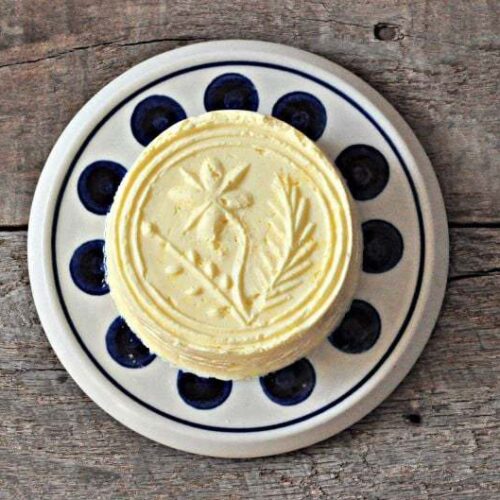
Besides, I think fresh homemade butter that has been molded is so pretty! The butter shown in the photos was molded in a wooden butter mold I received from my mother-in-law.
Yes, it takes a LITTLE extra work (shh, don't tell - people think you've slaved!) but it certainly makes the butter fancier.

Having our own family milk cow, we have plenty of fresh raw milk.
When the milk is allowed to stand, the cream separates and rises to the top. In times past, a milk churn was used to separate the butter fat, milk protein and water.
With the modern conveniences of blenders, food processors and mixers, making butter is a much quicker process. You can use a blender or food processor to make butter, but I used to use my mixer.
If you do not have your own family cow, the Weston A. Price Foundation and Real Milk can help you find sources of local raw dairy products.
How To Make Your Own Homemade Butte
The first step after separating the cream from the milk is to place the cream in the mixer and allow it to mix on medium speed.
You will begin to see clumps of butter forming in the liquid. This liquid is called buttermilk. Depending on how much cream you start with, this step takes 10 - 20 minutes.

When Clumps Form
Once the clumps are formed, the butter must be rinsed to remove any buttermilk that is left. If it is not rinsed thoroughly, the butter will sour quickly.
I do this by draining the buttermilk, covering the butter lumps with cold water in the mixer and mixing again on medium speed for a few seconds.
Continue repeating the draining, adding more water and mixing until the water is no longer milky looking. It usually takes about 3 or 4 times of rinsing to completely remove the buttermilk.
Once the rinse water is clear, it is time to salt the homemade butter.
The amount of salt added will depend upon the amount of butter you are making. Start with 1 tsp, mix and taste. Continue until the desired amount is added.
When the butter is well rinsed, shape the butter into the desired form. I use a ½ c. measuring spoon and press the butter into it with a spoon. Continue pressing the butter until all the water is removed.
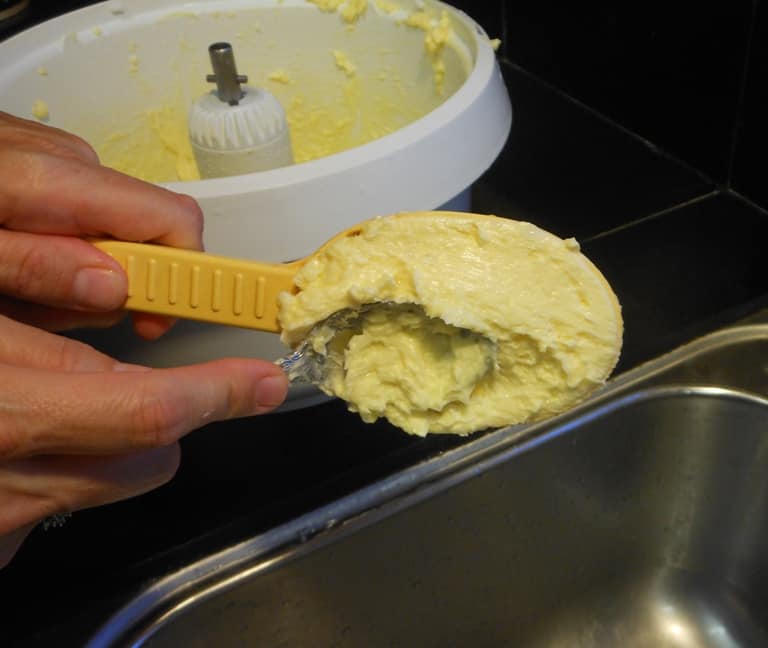
At this point, the formed butter may be used fresh or frozen for future use.
I place my formed butter on an inverted baking pan and place it in the freezer. After about an hour, the butter is firm enough to be placed into a freezer bag or other container.

When ready to use, remove the frozen butter and allow to thaw at room temperature. If you have rinsed the whey thoroughly, there is no need to refrigerate the butter - I leave mine on the table!
Some Recipes To Enjoy Your Homemade Butter On..
Now, enjoy your fresh butter! Slather some on a warm piece of fresh chocolate zucchini bread or on a gluten free strawberry muffin - the possibilities are endless!

If you’ve tried this recipe for making homemade butter or any other recipe on Cultured Palate please take a minute to rate the recipe and leave a comment letting me know how you liked it. I love hearing from you! You can also FOLLOW ME on PINTEREST, FACEBOOK, INSTAGRAM, YouTube and TWITTER.
📋 Recipe
How To Make Your Own Homemade Butter
Ingredients
- 2 cups cream
- salt to taste
Instructions
-
The first step after separating the cream from the milk is to place the cream in the mixer and allow it to mix on medium speed.
-
You will begin to see clumps of butter forming in the liquid. This liquid is called buttermilk. Depending on how much cream you start with, this step takes 10 - 20 minutes.
-
Once the clumps are formed, the butter must be rinsed to remove any buttermilk that is left. If it is not rinsed thoroughly, the butter will sour quickly.
-
I do this by draining the buttermilk, covering the butter lumps with cold water in the mixer and mixing again on medium speed for a few seconds. Continue repeating the draining, adding more water and mixing until the water is no longer milky looking. It usually takes about 3 or 4 times of rinsing to completely remove the buttermilk.
-
Once the rinse water is clear, it is time to salt the butter.
-
The amount of salt added will depend upon the amount of butter you are making. Start with 1 tsp, mix and taste. Continue until the desired amount is added.
-
When the butter is well rinsed, shape the butter into the desired form. I use a ½ c. measuring spoon and press the butter into it with a spoon. Continue pressing the butter until all the water is removed.
-
At this point, the formed butter may be used fresh or frozen for future use.
-
I place my formed butter on an inverted baking pan and place it in the freezer. After about an hour, the butter is firm enough to be placed into a freezer bag or other container.
-
When ready to use, remove the frozen butter and allow to thaw at room temperature. If you have rinsed the whey thoroughly, there is no need to refrigerate the butter - I leave mine on the table!
Notes
- Nutritional value is based on 1 cup of butter
- When ready to use, remove the frozen butter and allow to thaw at room temperature. If you have rinsed the whey thoroughly, there is no need to refrigerate the butter - I leave mine on the table!
- Some recipe to enjoy your homemade butter with.
- Now, enjoy your fresh butter! Slather some on a warm piece of fresh chocolate zucchini bread or on a gluten free strawberry muffin - the possibilities are endless!
Lea H @ Nourishing Treasures says
Thank you for your submission on Nourishing Treasures' Make Your Own! Monday link-up.
Check back shortly when the new link-up is running to see if you were one of the top 3 featured posts! :)
Shelby says
In fourth grade about 12 years ago we made butter with cream and shook it in Mason jars until it was done. It was delicious and I can still remember how good it was so long ago
Dina says
I would love to do this. I just got a butter press.
Dina-Marie says
Dina, I think you will be surprised at just how easy a butter press it - people think you have slaved for it but it couldn't be easier. If you have a wooden press, be sure to soak it in ice water 5 - 10 minutes before you are ready to use it and the butter will come out much easier!
Emily Kemp says
That butter mold is so cute, I'd love to do this!