
A good whole wheat bread recipe can be difficult to find. But, this is the best whole wheat bread ever! Whether sprouted or soaked - there is nothing like fresh, homemade bread right out of the oven. Serve hot with butter and honey.

There is nothing like fresh, homemade bread.
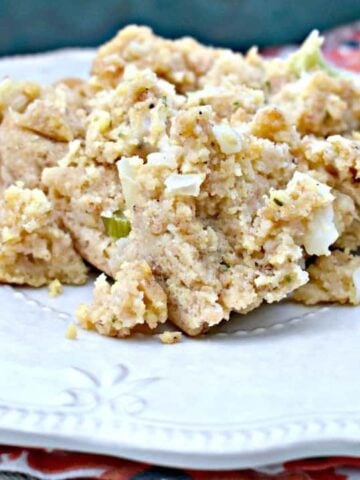
A Whole Wheat Bread right out of the oven is one of my favorite foods. Spread a hot slice with butter and honey - Mmmmm! I can not stop with just one!
We have been making our own bread for years. I use a Bosch Universal Kitchen Machine because it does such a wonderful job of kneading bread dough so as to develop the gluten, which makes for a lighter bread.
In fact, it is probably my favorite kitchen appliance! And it saves me all the trouble of kneading the bread dough myself. Anyone with a grandmother who used to bake bread regularly will tell you that that could take all day.
Why use sprouted or soaked flour?
Well, I did not know for years how important it is to properly prepare the grains we eat. All grain has phytic acid in the bran which is an anti-nutrient and prevents the absorption of many nutrients.
It is important to neutralize the phytic acid to get the most out of the foods we eat.
I use fresh ground whole wheat flour and I will give instructions for using sprouted flour. If you do not have sprouted flour, never fear, you can also soak your flour overnight and I will tell you how!
Why whole wheat?
The simple answer is: I just like it!
There are few breads out there better than a simple whole wheat bread for sandwiches and daily snacking. Not that I don't enjoy a good white bread! But a whole wheat bread can leave a very clean taste in your mouth, while a white bread can be a little sweet to my palate sometimes.
Soaking and sprouting breads work to unlock the hidden goodness within the ingredients of ordinary bread.
It's like super-charging the bread so that it becomes even better.
For more information on this topic, please read my post on Grain Preparation. I would go into it here, but I want to get us to the recipe.
The instructions for using the Soaked Flour Method follow the tutorial. Follow through to see the second recipe if you're interested in going forward with Sprouted.

Instructions
1. Place in Bosch or mixer of choice with dough hooks and mix:
- 4 c. flour
- 2 tsp. salt
- 1 tablespoon dough enhancer
- 5 c. warm water

2. After mixed, add
- ¾ c. olive oil
- ¾ c. honey
3. Mix well, and add
- 3 tablespoon yeast
4. Add more flour
- In the beginning, the dough will be soupy. See picture below for a reference.
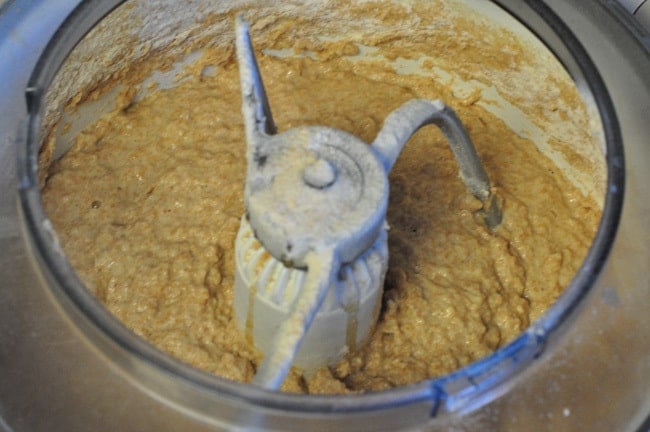
- Add the flour slowly allowing it mix thoroughly after each addition. The dough will become semi-soft but will still cling to the sides of the mixer.
- I add flour until the dough just begins to clean the sides of the mixing bowl - this may a bit more or less than 13 cups of flour. See picture below for reference.

5. Knead for 3 minutes
- Once the dough cleans the sides of the mixer, knead for 3 minutes. This gives the gluten a chance to develop.
6. Allow dough to sit for 20 minutes
- After 3 minutes, turn mixer off and leaving the dough in the mixer, allow it to rest for 20 minutes.
7. Knead for 5 minutes longer
- Turn the mixer of low speed and allow to knead for 5 minutes.
8. Allow dough to rest for 10 minutes
- Pour a little oil on the counter and place the dough on the oiled area to rest for 10 minutes. I prefer to spread the oil around a bit with my hand. This not only keeps the dough from sticking to your counter but also your hands as you remove the dough from the mixing bowl. You'll definitely want to keep your hands tactile as you work with the dough.

9. Form Loaves
- Shape the dough into loaves. I like to divide the dough into 4 equal parts.

10. Place dough in bread pans
- Form each lump of dough into a loaf and place in prepared pans, each greased with olive oil.
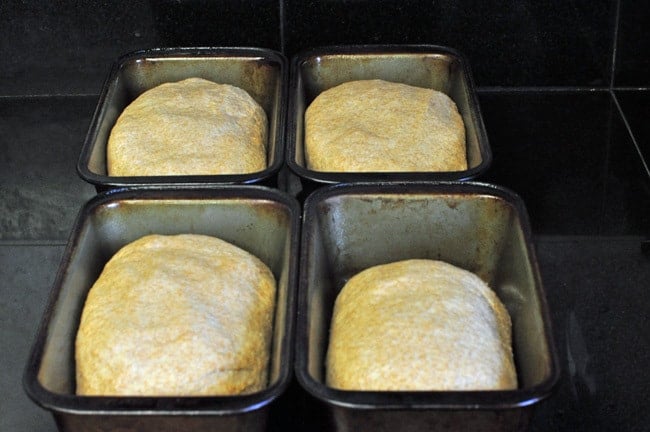
11. Allow the bread to rise
- Cover the pans with a towel and let the loaves rise for 40 minutes.
- Your bread is now ready to bake!

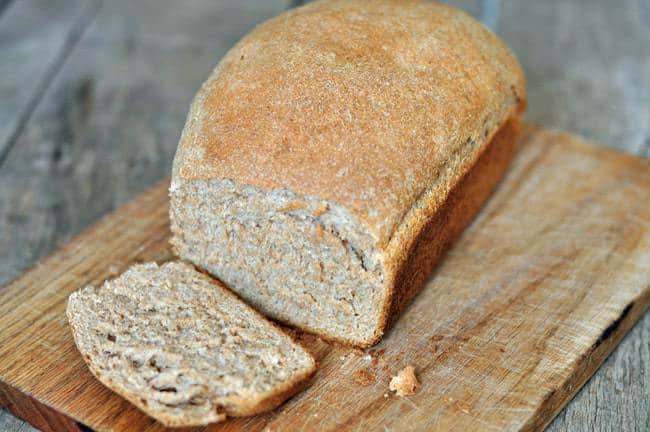
12. Bake
- Bake at 350F for 30 - 40 minutes, until golden brown.
13. Enjoy!
- Remove from the pans and allow to cool. Unless of course, you want to indulge in fresh, hot, honey-butter and bread! And who could blame you?
Soaked Flour Method
Soaking the flour yields a slightly heavier bread but is also delicious. It is also an effective method of neutralizing the phytic acid. Again, it is all down to personal preference and dietary needs.
The night before baking bread:
- place all flour (13 c.) into the Bosch.
- Add 4 ¾ c. water and ¾ c. kefir, whey, or yogurt and mix until moist.
- Leave covered overnight.
In the morning:
- Proof the yeast by mixing: 3 tablespoon yeast, ½ c. water and 2 teaspoon honey, allow to sit for 5 min.
- When the yeast is bubbly, add all other ingredients along with yeast to the flour mixture.
- Knead 5 min.
- Continue with the above recipe (skipping the knead 3 min. and let sit for 20 min) and allow the dough to rest on the counter for 10 minutes, shape into loaves and place in pans. Rise for 40 min. and bake @ 350F for 30 - 40 min.
Enjoy! As always, I would be remiss to have this bread without butter and honey. You absolutely must try it.
If you’ve tried this whole wheat bread or any other recipe on Cultured Palate please take a minute to rate the recipe and leave a comment letting me know how you liked it. I love hearing from you! You can also FOLLOW ME on PINTEREST, FACEBOOK, INSTAGRAM, YouTube and TWITTER.
📋 Recipe
Whole Wheat Bread
Ingredients
- 13 cups sprouted whole wheat flour
- 2 teaspoon salt
- 1 tablespoon dough enhancer
- ½ cups vital wheat gluten optional - since the GAPS diet, I now leave it out
- 5 cups warm water
- ¾ cups olive oil
- ¾ cups honey
- 3 tablespoon yeast
Instructions
-
Place in Bosch or mixer of choice with dough hooks and mix: 4 c. flour, 2 teaspoon salt, 1 tablespoon dough enhancer, 5 c. warm water.
After mixed add:
-
¾ c. olive oil and 3.4 c. honey
Mix well and add:
-
3 tablespoon yeast, add more flour
-
In the beginning, the dough will be soupy. Add the flour slowly allowing it mix thoroughly after each addition. The dough will become semi-soft but will still cling to the sides of the mixer.
-
I add flour until the dough just begins to clean the sides of the mixing bowl - this may a bit more or less than 13 cups of flour. See picture below for reference.
-
Knead for 3 minutes. Once the dough cleans the sides of the mixer, knead for 3 minutes. This gives the gluten a chance to develop. Allow dough to sit for 20 minutes.
-
After 3 minutes, turn mixer off and leaving the dough in the mixer, allow it to rest for 20 minutes.
-
Knead for 5 minutes longer. Turn the mixer of low speed and allow to knead for 5 minutes.
-
Allow dough to rest for 10 minutes. Pour a little oil on the counter and place the dough on the oiled area to rest for 10 minutes.
-
I prefer to spread the oil around a bit with my hand. This not only keeps the dough from sticking to your counter but also your hands as you remove the dough from the mixing bowl.
-
You'll definitely want to keep your hands tactile as you work with the dough.
-
Shape the dough into loaves. I like to divide the dough into 4 equal parts.
-
Place dough in bread pans. Form each lump of dough into a loaf and place in prepared pans, each greased with olive oil.
Allow the bread to rise:
-
Cover the pans with a towel and let the loaves rise for 40 minutes. Your bread is now ready to bake!
To Bake:
-
Bake at 350F for 30 - 40 minutes, until golden brown.
-
Remove from the pans and allow to cool. Unless of course, you want to indulge in fresh, hot, honey-butter and bread!
Soaked Flour Method:
-
Soaking the flour yields a slightly heavier bread but is also delicious. It is also an effective method of neutralizing the phytic acid. Again, it is all down to personal preference and dietary needs.
The night before baking bread:
-
place all flour (13 c.) into the Bosch. Add 4 ¾ c. water and ¾ c. kefir, whey, or yogurt and mix until moist.
-
Leave covered overnight.
In the morning:
-
Proof the yeast by mixing: 3 tablespoon yeast, ½ c. water and 2 teaspoon honey, allow to sit for 5 min.
-
When the yeast is bubbly, add all other ingredients along with yeast to the flour mixture. Knead 5 min.
-
Continue with the above recipe (skipping the knead 3 min. and let sit for 20 min) and allow the dough to rest on the counter for 10 minutes, shape into loaves and place in pans. Rise for 40 min. and bake at 350F for 30 - 40 min.
Notes
- Nutritional value is per loaf which serves 8-10.
- Nutritional facts exclude dough enhancer, which adds less than ten calories to the entire loaf.


Cinnamon says
This is where I am headed next....soaking grains. I found that my dtr and I can eat sprouted bread with no problems which is such a blessing for us both.
I love my Bosch. Love, love, love it!! Perfect for making dough.
I always find something new when I peek in here and love browsing back through your posts.
~Cinnamon
p.s so glad you stopped by for a visit the other day :-)
Julie says
Hmmm..... I've just mixed my flour, water & yogurt to soak overnight, and in reading thru the rest of the recipe I'm adding up the liquids. Do you realize the soaked version has a whole extra cup of liquids - making the water & whey (incl. the extra water in the morning to proof the yeast) a total of 6c (vs. the 5c water in the traditional recipe)?
I've been making bread using a different recipe & soaking the flour overnight and have never increased the liquids for other recipes. Wondering if it's a typo?
Dina-Marie says
Julie, I do add an extra cup of liquid because without it the bread is too dry. Even with the addition of the extra liquid it will be denser than if you do not soak it but it tastes great!
Jessica Cadeau says
I noticed in this recipe you call for 1 Tablespoon of dough enhancer, but when you go to the recipe link for the dough enhancer, you call for 3 Tablespoons of dough enhancer for a 4 loaf batch. So, should I use 1 tablespoon or 3?
Thank you for this recipe!
Dina-Marie says
Jessica, thank you - it is only 1 Tbsp and I updated the dough enhancer recipe. It would not hurt to use more but you don't need it!
Judy says
It's hard finding dough enhancer at the store and to make it from scratch can be very expensive. How does dough enhancer compare with vital wheat gluten? Could that be substituted? We're used to using a majority of bread flour along with VWG in our bread recipes and hate to spend so much money only to find that the kids don't like the bread! I buy One Degree sprouted WW flour from our co-op and just love it so am looking forward to trying your recipe!
Dina-Marie says
Judy, they are different - before the GAPS diet, I used both (I have updated the recipe) - adding 1/2c vital wheat gluten to the recipe. They both work to make the bread light and fluffy. If you but a large container of lecithen (which is the most expensive part) it will last a very long time since you use so little in the actual recipe. Let me know how you like it!
Amy Dougherty says
My loafs don't rise as much as yours seem to. Should I just allow more time to rise? Flat or puffy, the bread tastes incredible, very hard to not gobble up half a loaf after it comes out! Thank you!!
Dina-Marie says
Amy, not sure why but I would try waiting and letting it rise a bit longer - let me know!
Emily Kemp says
I had no idea about preparing flour in this way, so interesting to read. Thanks Dina-Marie!
Tina Rigdon says
One of my favorite things to do lately is to make my own bread. I found that store bread molds so fast. I have tired a wheat bread recipe, but this one is my new go to!
Dina-Marie says
This is my go to recipe too, Tina! So glad you enjoy it!
Hanna says
I love the step by step with pictures! It's so helpful! thank you for taking the time to do this!
Dina-Marie says
You are welcome, Hanna, and so glad it helped!